xv6 util lab
在闲暇之余,抽出了一部分时间看了看MIT 6.S081课程的实验一,这个实验可能也许是最简单的一个实验了吧,完全没有涉及到操作系统内部原理相关的知识,只是用xv6的系统调用编写用户态的程序。我也不知道花了不知道多久,断断续续的把实验一干完了。该实验的实验要求见 https://pdos.csail.mit.edu/6.828/2020/labs/util.html.
准备
编译并使用qemu模拟启动操作系统方法为
打分测试的命令如下
测试某个具体的用例,如测试sleep,方法有两种
1
2
| ./grade-lab-util sleep # 第一种方法
make GRADEFLAGS=sleep grade # 第二种方法
|
sleep
该任务非常简单,写一个sleep程序,能通过命令行参数指定sleep的tick数(tick指一个时钟周期)。程序非常简单,在user目录下新建文件sleep.c,编写代码如下
 1
 2
 3
 4
 5
 6
 7
 8
 9
10
11
12
13
14
| #include "kernel/types.h"
#include "kernel/stat.h"
#include "user/user.h"
int
main(int argc, char *argv[])
{
if(argc <= 1){
write(1,"error: no input from user !\n",28);
exit(-1);
}
sleep(atoi(argv[1])); // sleep 为系统调用 参数为tick数,将命令行参数通过atoi转为整数即可
exit(0);
}
|
编写完成后还需要修改Makefile中的UPROGS(这应该是user programs的意思),添加sleep,如下
 1
 2
 3
 4
 5
 6
 7
 8
 9
10
11
12
13
14
15
16
17
18
19
20
| U=user # 用户态程序目录
UPROGS=\
$U/_cat\
$U/_echo\
$U/_forktest\
$U/_grep\
$U/_init\
$U/_kill\
$U/_ln\
$U/_ls\
$U/_mkdir\
$U/_rm\
$U/_sh\
$U/_stressfs\
$U/_usertests\
$U/_grind\
$U/_wc\
$U/_zombie\
$U/_sleep # 这是添加的一行内容
|
修改后make qemu进入xv6系统可以看到多出了一个sleep程序。该程序能通过打分程序。
pingpong
这个也很简单,直接贴上user/pingpong.c代码如下
 1
 2
 3
 4
 5
 6
 7
 8
 9
10
11
12
13
14
15
16
17
18
19
20
21
22
23
24
25
26
27
28
29
30
31
32
33
34
| #include "kernel/types.h"
#include "kernel/stat.h"
#include "user/user.h"
int
main(int argc, char *argv[])
{
int p1[2],p2[2];
char byte; // byte
// 两条管道 双向通信
pipe(p1); // parent to child
pipe(p2); // child to parent
if(fork() != 0){ // parent
close(p2[1]);
close(p1[0]);
write(p1[1],"0",1); // write a byte
read(p2[0],&byte,1); // read a byte
printf("%d: received pong\n",getpid());
close(p2[0]);
close(p1[1]);
exit(0);
}else{ // child
close(p2[0]);
close(p1[1]);
read(p1[0],&byte,1); // read a byte
printf("%d: received ping\n",getpid());
write(p2[1],&byte,1); // write a byte
close(p2[1]);
close(p1[0]);
exit(0);
}
}
|
primes
该任务需要编写程序输出2~35中的所有质数,比较特殊的要求是使用并发的方式来筛选质数,算法描述见 http://swtch.com/~rsc/thread/
算法描述
用一张图来描述这个筛选质数的并发算法,如下
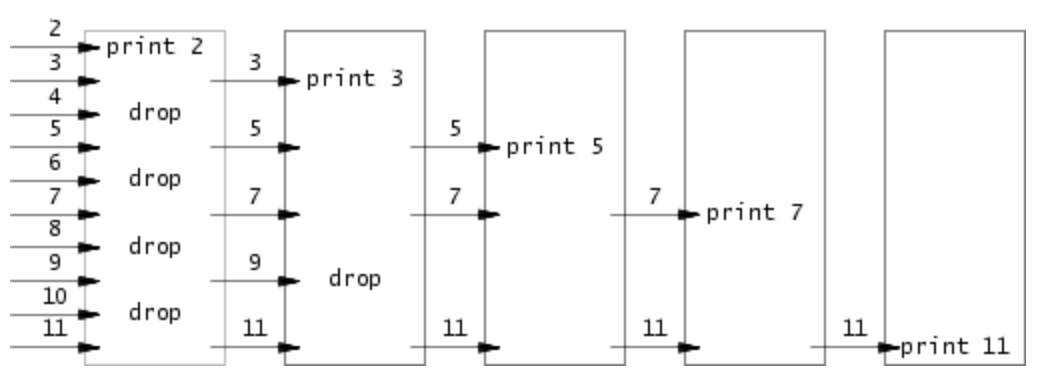
上图中每一个框框为一个独立执行的例程(可以是process、thread或者别的什么比如golang中的goroutine,总之是可以并发执行的一段程序),每一个例程可以给右边的邻居发送筛选出来的有可能是质数的数,每一个例程都会进行相应的筛选,选出来的数发给右边的邻居。
其中第一个例程会收到2-MAX所有的数字,收到的第一个数字当做质数输出(显然第一个数是2,是质数)。第一个例程知道2是质数了,那第一个例程接下来收到的所有数字,如果可以被2整除,那一定不是质数,不能被2整除的有可能是质数,将有可能是质数的数发送给右边的邻居,右边的邻居做进一步的筛选。
接下来看第二个例程,可以确定的是,第二个例程收到的第一个例程的第一个数字一定也是个质数。为什么呢?第二个例程收到的第一个数字(记作p)一定大于2(大于前一个例程认定了是质数的数),所有小于p的质数(目前来看就是2)都不是p的因子,那p肯定也是质数。所以第二个例程可以将收到的第一个数认定为质数,将其输出。接下来收到的数字,第二个例程将检测是否能被p整除,若不能才可能是质数,第二个例程会将有可能是质数的数发给右边的邻居(即第三个例程)。显然第三个例程收到的数字一定不会被前两个质数整除,那么第三个例程收到的第一个数字也是个质数……
用数学归纳法可以容易看出,每个例程收到的第一个数都是质数,且每一个例程都会把可能是质数的数发给右邻居进一步筛选,每一个例程行为的伪代码描述为
1
2
3
4
5
6
| p = get a number from left neighbor
print p
loop:
n = get a number from left neighbor
if (p does not divide n)
send n to right neighbor
|
算法实现
这个任务就要实现这一个算法。在我的实现中,使用进程作为一个独立的例程,主进程负责发送2-35所有的数字,然后开启第一个进程进行筛选,接着每一个进程根据需要判断是否需要开启右邻居,先看主进程代码如下
 1
 2
 3
 4
 5
 6
 7
 8
 9
10
11
12
13
14
15
16
17
18
| int main(int argc,char *argv[]){
int p;
int to[2];
int status;
pipe(to); // to 是主进程发送2~35所有数字给第一个例程所用的管道
if(fork() != 0){ // parent
close(to[0]); // do not read 不用的资源尽快close 主进程用该管道不需要读
for(p = 2;p <= 35;p++)
write(to[1],&p,sizeof(p)); // 将2~35所有数字写入管道
close(to[1]);
}else{ // child
worker(to); // 子进程,即上面示意图中的例程,接收父进程发送的数字
exit(0);
}
wait(&status); // 主进程等待子进程结束
exit(0);
}
|
接着来看看每一个例程的描述函数worker的实现,worker完全按照前文的伪代码实现
 1
 2
 3
 4
 5
 6
 7
 8
 9
10
11
12
13
14
15
16
17
18
19
20
21
22
23
24
25
26
27
28
29
30
| void worker(int from[]){ // 参数为接收左邻居数字的管道
int forked = 0; // 标记是否开启过右邻居进程
int to[2];
close(from[1]); // do not write to from 该管道我只使用读端,不使用写端,没用的资源尽快释放
int p; // 接收第一个数字
read(from[0],&p,sizeof(p)); // read first p
printf("prime %d\n",p); // 第一个数字一定是质数
int t; // 接收数字
while(read(from[0],&t,sizeof(t) != 0)){ // 该循环里面不断接收数字,挑出可能是质数的数字发给右邻居
if(t % p != 0){ // t有可能是质数 这需要发给右邻居了
if(!forked){ // 还没有右邻居
pipe(to); // 创建和右邻居通信的管道
if(fork() != 0){ // parent
close(to[0]);// 本进程关闭管道读端
}else{ // child
worker(to); // 子进程从to读取数字
exit(0);
}
forked = 1; // 标记已经开启过子进程
}
write(to[1],&t,sizeof(t)); // 发送t给子进程
}
}
// 释放资源
close(from[0]);
close(to[1]);
// 等待右邻居退出
int status;
wait(&status);
}
|
以上两段代码实现了该任务。
另外吐槽一下,经过我的尝试,下面这段代码也是可以通过测试的,看来MIT的测试也不过是验证输出罢了…
 1
 2
 3
 4
 5
 6
 7
 8
 9
10
11
12
13
14
15
16
17
18
| int is_prime(int n){
int p = n/2;
for(int i = 2; i <= p;i++){
if(n % p == 0)
return 0;
}
return 1;
}
int
main(int argc, char *argv[])
{
for(int i =2;i <= 35;i++){
if(is_prime(i))
printf("prime %d\n",i);
}
exit(0);
}
|
find
该任务需要实现一个极简版的find,功能如下所述
在<path>路径中搜索文件名为<filename>的文件,示例如下
 1
 2
 3
 4
 5
 6
 7
 8
 9
10
| $ make qemu
...
init: starting sh
$ echo > b
$ mkdir a
$ echo > a/b
$ find . b
./b
./a/b
$
|
xv6的目录项
在类unix系统中一般使用基于inode的文件系统(可以参考上交的《现代操作系统:原理与实现》个人感觉挺不错),在这种文件系统下,inode记录了一个文件的所有内容存在disk的位置,所以知道了inode就知道了某一个文件。在类UNIX系统下目录也是普通的文件,文件内存着一个个目录项,即记录着inode号和其他一些文件信息,在xv6内,目录项如下
1
2
3
4
5
6
7
8
9
| // kernel/fs.h
// Directory is a file containing a sequence of dirent structures.
#define DIRSIZ 14
struct dirent {
ushort inum; // inode number
char name[DIRSIZ]; // filename
};
|
fstat和stat
xv6中获取文件信息的系统调用为fstat,使用该函数还封装了一个用户态下的工具函数stat,两个函数原型如下
 1
 2
 3
 4
 5
 6
 7
 8
 9
10
11
12
13
14
15
16
17
| // system call
int fstat(int fd, struct stat*); // fd 为文件描述符
// ulib.c
int stat(const char*, struct stat*);
int stat(const char *n, struct stat *st) // 函数定义
{
int fd;
int r;
fd = open(n, O_RDONLY);
if(fd < 0)
return -1;
r = fstat(fd, st);
close(fd);
return r;
}
|
其中描述文件信息的结构定义如下
 1
 2
 3
 4
 5
 6
 7
 8
 9
10
11
| #define T_DIR 1 // Directory
#define T_FILE 2 // File
#define T_DEVICE 3 // Device
struct stat {
int dev; // File system's disk device
uint ino; // Inode number
short type; // Type of file
short nlink; // Number of links to file
uint64 size; // Size of file in bytes
};
|
实现
有了上面的铺垫,容易编写find代码如下
 1
 2
 3
 4
 5
 6
 7
 8
 9
10
11
12
13
14
15
16
17
18
19
20
21
22
23
24
25
26
27
28
29
30
31
32
33
34
35
36
37
38
39
40
41
42
43
44
45
46
47
48
| void find(char *path,char *filename){ // 该函数在 path 内找 文件名为filename的文件
int fd;
struct stat st;
struct dirent de;
char buff[512];
char *p;
strcpy(buff,path); // 路径复制到buff里
p = buff + strlen(buff);
*p ++ = '/'; // path 后加一个 /
if((fd = open(path,0)) < 0){ // 打开path这个目录文件
fprintf(2,"find: cannot open file:%s\n",path);
return;
}
if(fstat(fd,&st) < 0){ // 没能获取文件信息
fprintf(2,"find: cannot stat\n");
close(fd);
return;
}
if(st.type != T_DIR){ // path 不是目录文件
fprintf(2,"find: path:%s is not a directory\n",path);
close(fd);
return;
}
while(read(fd,&de,sizeof(de)) == sizeof(de)){ // 遍历每一个目录项
// 无效的inode 或者. 和 ..都不继续搜索
if(de.inum == 0 || strcmp(de.name,".") == 0 || strcmp(de.name,"..") == 0)
continue;
strcpy(p,de.name); // path/filename
stat(buff,&st); // 获取文件信息
switch (st.type)
{
case T_FILE: // 普通文件
if(strcmp(de.name,filename) == 0)
printf("%s\n",buff);
break;
case T_DIR: // 目录文件则递归搜索
find(buff,filename); // find recursively
break;
default:
break;
}
}
}
|
主函数编写如下
1
2
3
4
5
6
7
8
9
| int main(int argc,char *argv[]){
if(argc <= 2){
fprintf(2,"find: no enough argument\n");
exit(-1);
}
find(argv[1],argv[2]);
exit(0);
}
|
xargs
该任务要求实现一个极简版的xargs,貌似也没什么好解释的,就是熟悉fork和exec即可,直接粘代码如下
 1
 2
 3
 4
 5
 6
 7
 8
 9
10
11
12
13
14
15
16
17
18
19
20
21
22
23
24
25
26
27
28
29
30
31
32
33
34
35
36
37
38
39
40
41
42
43
44
45
46
47
48
49
50
51
52
53
54
55
56
57
58
59
60
61
62
| #include "kernel/types.h"
#include "kernel/stat.h"
#include "user/user.h"
#include "kernel/fs.h"
#include "kernel/param.h"
#define EOF -1
int getchar(){
char ch;
if(read(0,&ch,sizeof(ch)) <= 0)
return EOF;
return (int)ch;
}
int readline(char *buf){
int ch;
while((ch = getchar()) != '\n' && ch != EOF)
*buf++ = ch;
*buf = 0;
if(ch == EOF)
return EOF;
return 1;
}
int main(int argc,char *argv[]){
char buf[512];
if(argc <= 1){
fprintf(2,"xarg: no enough arguments\n");
exit(-1);
}
int p = 0,q;
char *command = argv[1];
char *args[MAXARG];
args[p++] = command;
for(int i = 2;i < argc;i++)
args[p++] = argv[i]; // arguments from argv
q = p;
while(readline(buf) != EOF){
args[q] = malloc(strlen(buf));
strcpy(args[q++],buf);
}
args[q] = 0;
int status;
if(fork() == 0){ // child
exec(command,args);
}else{ // father
wait(&status);
}
for(;p < q;p ++)
free(args[p]);
exit(0);
}
|
尾声
说实话不知道这个MIT 6.S081还能坚持多久,能坚持一个lab就多坚持一个吧☺️
代码放到 https://github.com/XieWeikai/xv6_lab 的 lab1分支啦,但目前该仓库还是private的,等到这个课程真的完成的差不多了再准备公开了哈哈哈。
